Hello my friends, wow! it's been a long time since I last posted on my blog!
I just wanted to share my projects from this summer, an ode to "What I did this summer" from our elementary school days. Nothing major, just a few fun things, up-cycling is kind of my thing, as you all know.
Some of my favourite things came from the "trash - to treasure" pile. I truly believe in re-using, re-inventing, or re-cycling things. I have a hard time seeing perfectly usable wood, or wooden furniture being sent of to no man's land - landfill - is not where real wood furniture should end up. Real wood as opposed to laminate furniture is not that easy to find nowadays, so much of what's being sold now will not be the kind of things we pass down to our children.
If it's an antique, something passed down, but it has seen better days, I'm talking scarred finish that cannot be sanded down and re-finished, but it still has sentimental value, why not paint it to fit into your decor instead of throwing it away?
Any pieces that are worth refinishing, can be sent to someone who will re-finish it for you, or you could attempt to do it yourself. There's a ton of information and videos available on line to teach you every step. Pinterest is one of my favourites, anything can be found there.
And I mean ANYTHING!
I personally take it as a challenge to re-hab items that I find that are worthy. Like I said, when it comes to wood, i cannot pass up a pile without checking if it's usable. That's how I was able to build our king size bed without spending virtually any money. My only investment was my time and energy.
I love building things, but because of my physical limitations cannot tackle the larger projects anymore. Or rather, I can, but will have to let my body rest for several days afterwards. Fortunately, smaller projects are something I can still tackle, as long as I pace myself.
These chairs are a challenge I gave myself. I nailed it, getting exactly what I wanted, oh, wait, except for one thing. I didn't realize the springs would squeak! I'm guessing a little oil in the right areas would take care of that problem, I just haven't gotten around to doing that yet. I shared the before and after of these on Facebook, but here's that project in more detail.
Before:
They are very old chairs, probably from the 1930's or 1940's. The were stuffed with hay. They were very easy to remove, attached with four screws, one in each corner.
The chair seats had already been re-covered, so removing that was my next step.
Taking the seats apart was a long, arduous task. I removed literally hundreds of staples and little nails, using a flat screwdriver and a pair of needle nose pliers.
Surprise, under the first fabric was a second, some old "faux" leather, which meant more staples and nails to remove...
Then came the old torn burlap.
Once that was removed, I had the skeleton of a seat.
I started to rebuild it by first adding some plain fabric for the under belly of the seat so that to cover the springs.
I attached it using a staple gun.
Unfortunately, I forgot to take pictures of the next step.
I cut foam that I purchased at Walmart to fit the seat, then the new fabric I chose.
In this case, I chose a turquoise curtain made of microsuede, purchased at Walmart for $12.00. I chose that particular fabric because my cat doesn't claw it. Our couch is covered in it and she has never once clawed it. I wish I could say the same for my wainscoting wallpaper, but that's another story!
Once the fabric was cut to fit, I applied it to the seat by stapling the underside to the wooden seat.
Then it was time to spray paint the chairs, which I had washed down really well.
I used Premier Paint + Primer in a colour called Atlantis (satin).
I ended up using 3 cans to cover 4 chairs.
Then I put the seats back on the chairs attaching them with 4 screws.
After:
They turned out just as I had pictured them.
Here are my pretty, but squeaky chairs!
It was an easy but time consuming project. Anyone can do it.
--------------------------------------------------------------------------------------------------------------------------
My next project was to recover 4 chairs for my hairdresser's new salon. I forgot my camera for that one, again. It was a more difficult project because the chairs had rounded backs. It was indeed a challenge. I managed to get it right after using a few words I can't repeat here, and they turned out great. My hairdresser and I decided to use the barter system, so she is paying me by doing my hair two times for free. It's a great deal for me because she is doing colour, highlights (foils) and cut.
----------------------------------------------------------------------
My next project, and possibly my favourite was staging a friend's house. I had so much fun doing it. How could I not, the theme being the beach!? I managed to stage the entire house and outdoor space in one day. It turned out beautifully with a mainly white decor accented with blues, teal and turquoise. Seashells, candles, throw pillows, and other decor pieces gave it just the right amount of "beach vibe" without being too much. It helped that the house is facing the water, with fantastic views and amazing sunsets. It was a great way for me to use my creativity without being in too much pain afterwards. It was a long day, but well worth the gratification I felt afterwards. I loved it!
---------------------------------------------------------------------------
I couldn't believe my luck when I found that exact table it in a heap of things destined for landfill! The drawers had been removed and were scattered throughout the pile. The table and drawers were dirty, grimy and just rather gross. One of the drawers even had a rat trap in it, but thankfully no rat!
I borrowed a dolly, loaded the heavy table and proceeded to my backyard, where I washed it all with bleach. It was then ready for the sander. I still don't understand why someone wouldn't take it to a thrift store instead of throwing it out. It's made of solid wood. The top is thick butcher block.
Well, thank goodness they didn't, because I finally found my table!
The six drawers were still intact, although dirty and in need of a sanding as well.
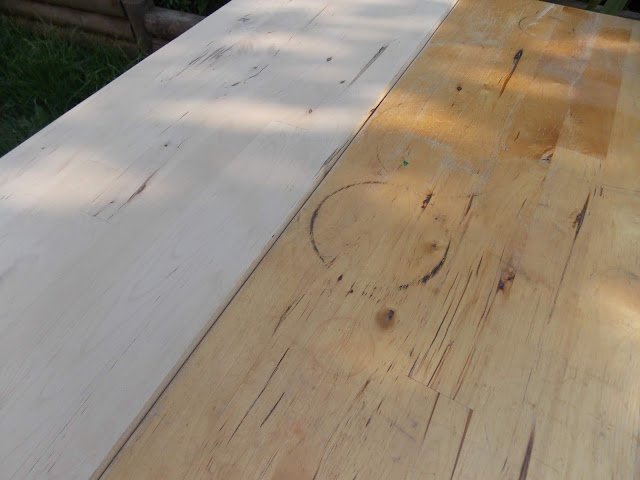
Oh, what a difference a good sanding can make! Pretty amazing isn't it?!
It looks brand new!
The drawers got a sanding as well. Then I lined the bottoms with shelf paper.
I spray painted the drawer fronts white, as well as the table legs and varnished the top with a clear water based varnish to protect it.
Sawyer just had to put his mark on it. Yeah, not once, but twice! Luckily I had already painted the legs and it was just a question of washing them down.
Thanks for the help there, little buddy! LOL
It's a good thing he's so darn cute!
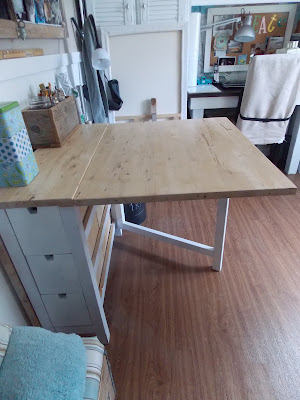
Here is the completed table in my craft space. I LOVE IT!
It's perfect for larger projects like painting or sewing, and holds all my painting supplies in the three drawers on each side.
Perfect! :)
That's all for now.
Thanks for following!
xo


YOU have more talent in your little finger...
ReplyDelete